WHEAT:NEWS TV MARCH 2018 Volume 5, Number 3
Stereo Miking Technique You Should Know
Playing the middle against the sides
By Scott Johnson
Every broadcast engineer finds himself in this situation from time to time. Say your morning news show has brought in a local jazz combo who’ll play into a break. You want a nice, clean, wide stereo image, but you want it to be mono-compatible for all those TV’s in airports, kitchens, and restaurants that have mono speakers.
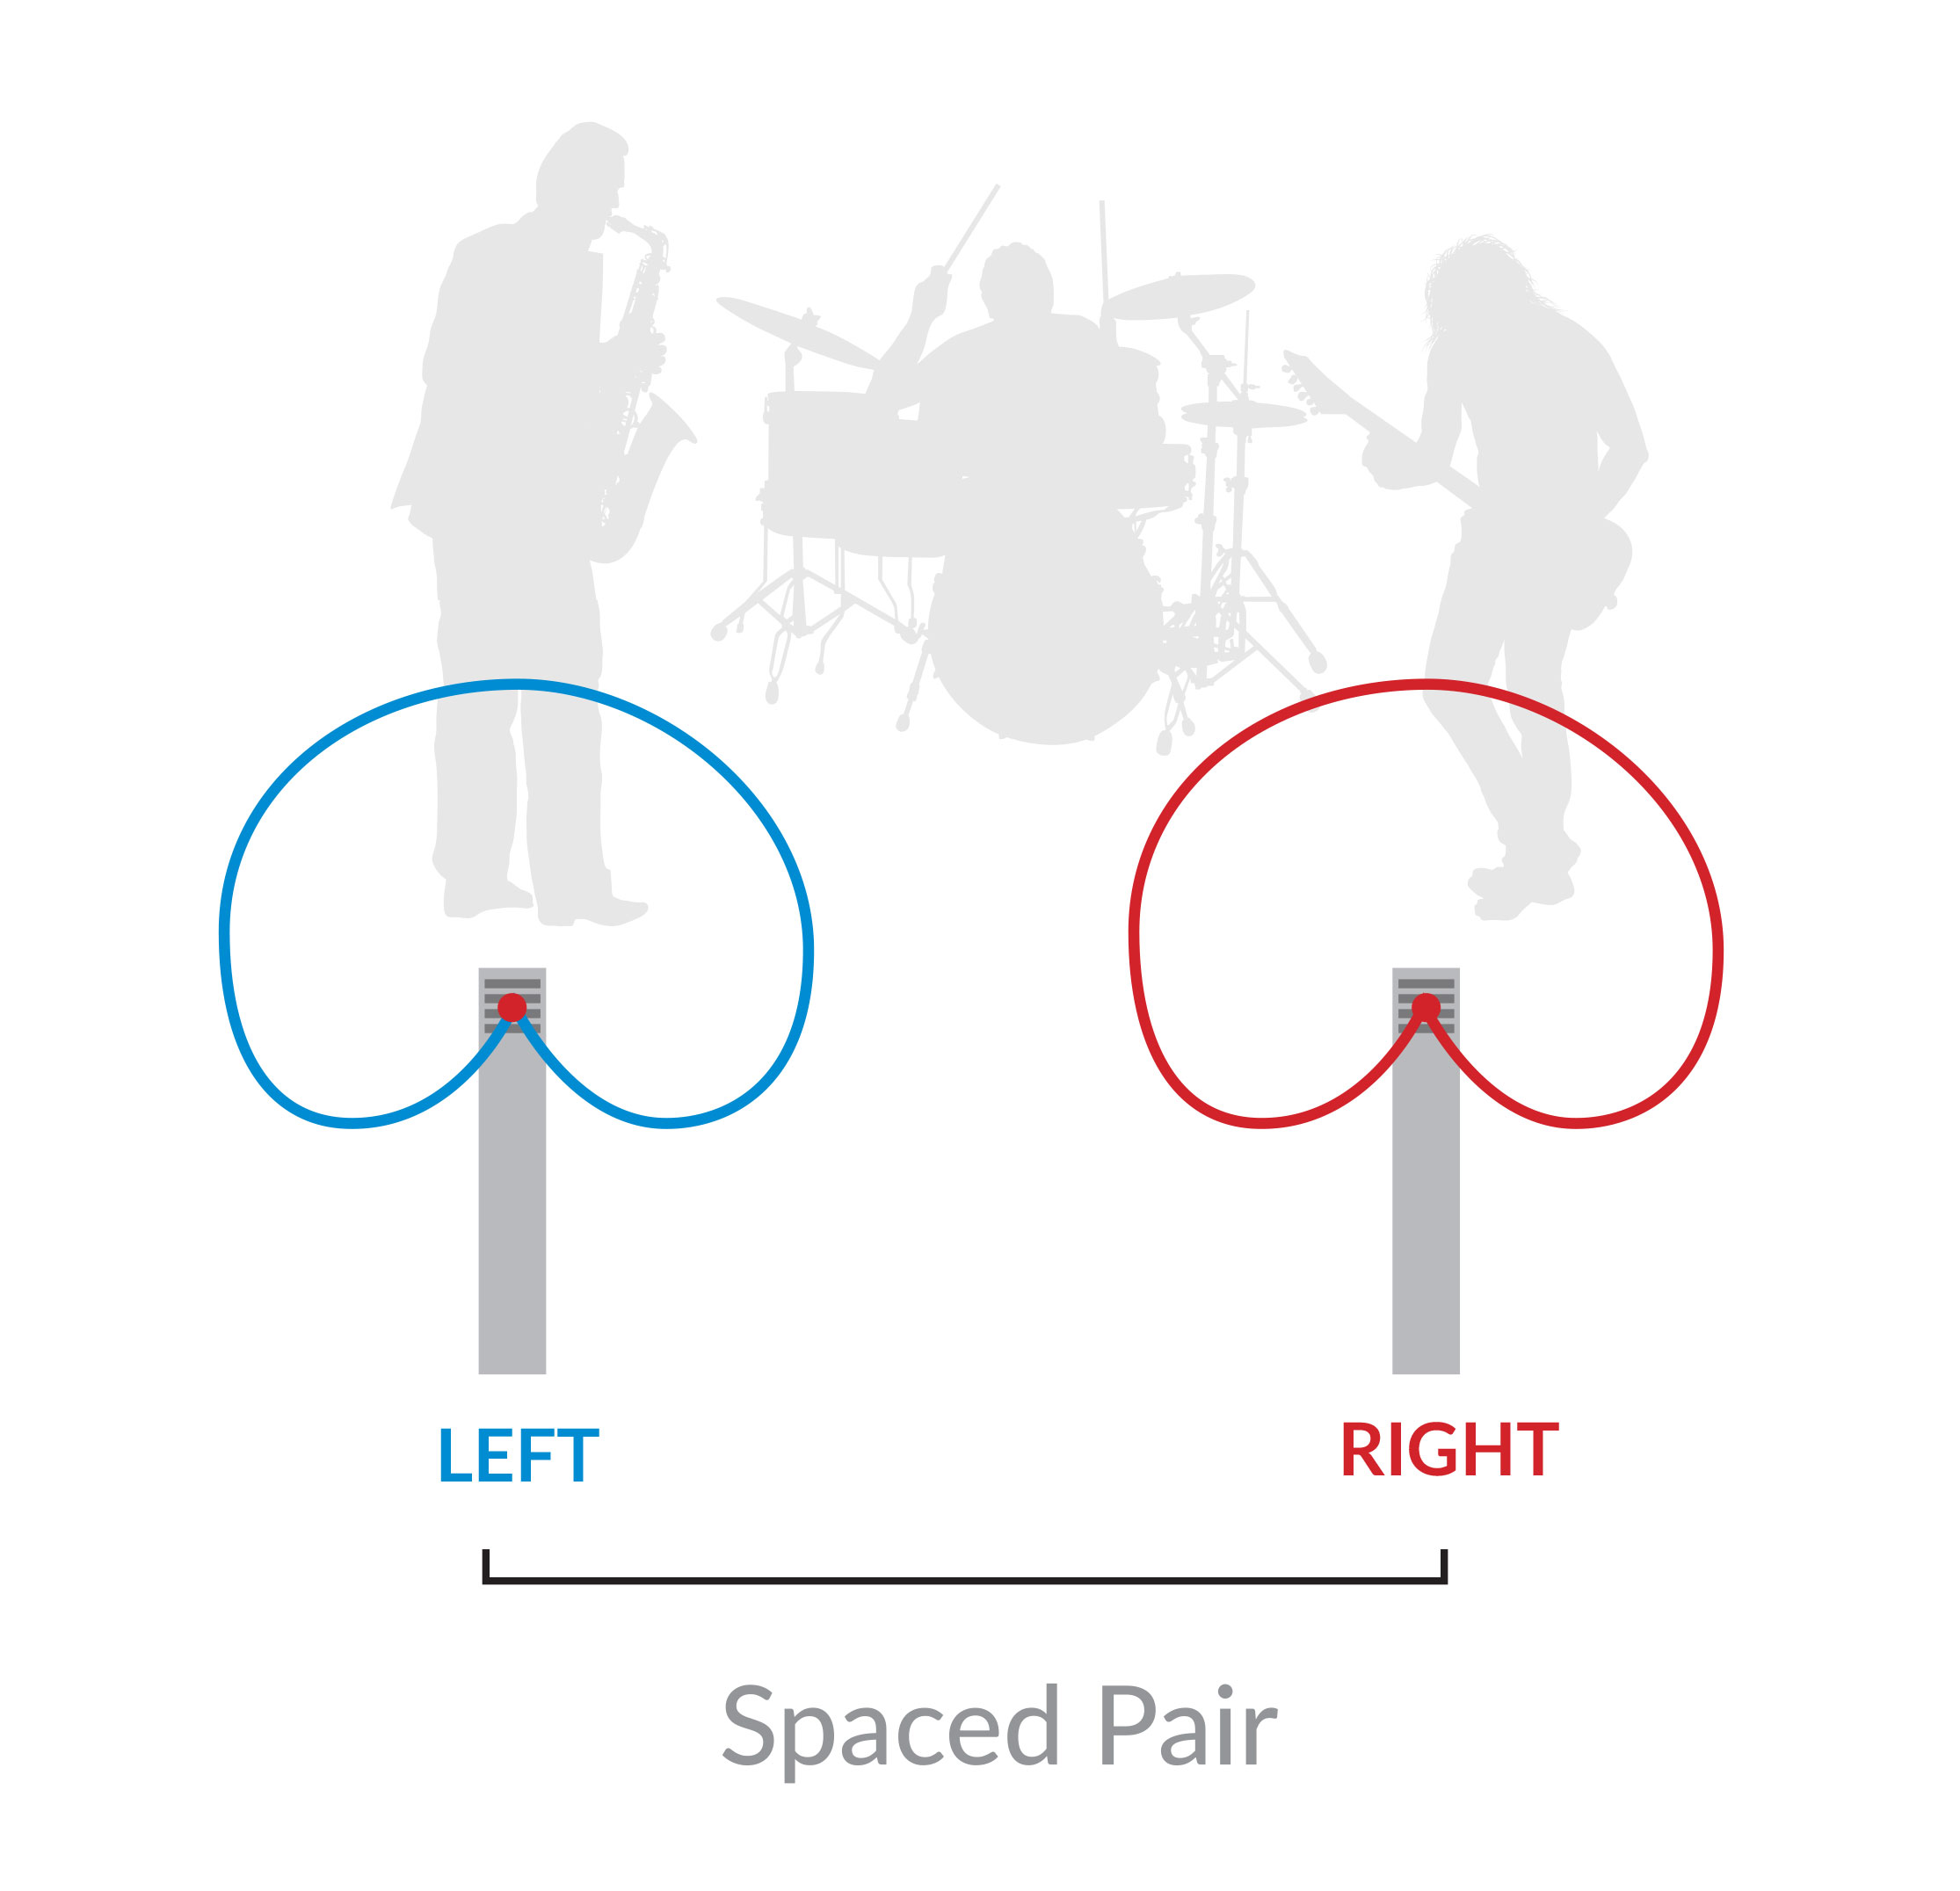 One common technique is the spaced pair, where you place two microphones far apart, just as the early experimenters with stereo sound did. This results in an unnaturally wide stereo listening experience, which we might like. But when it’s collapsed to mono it’s a mess because of phase cancellation. So that one’s out.
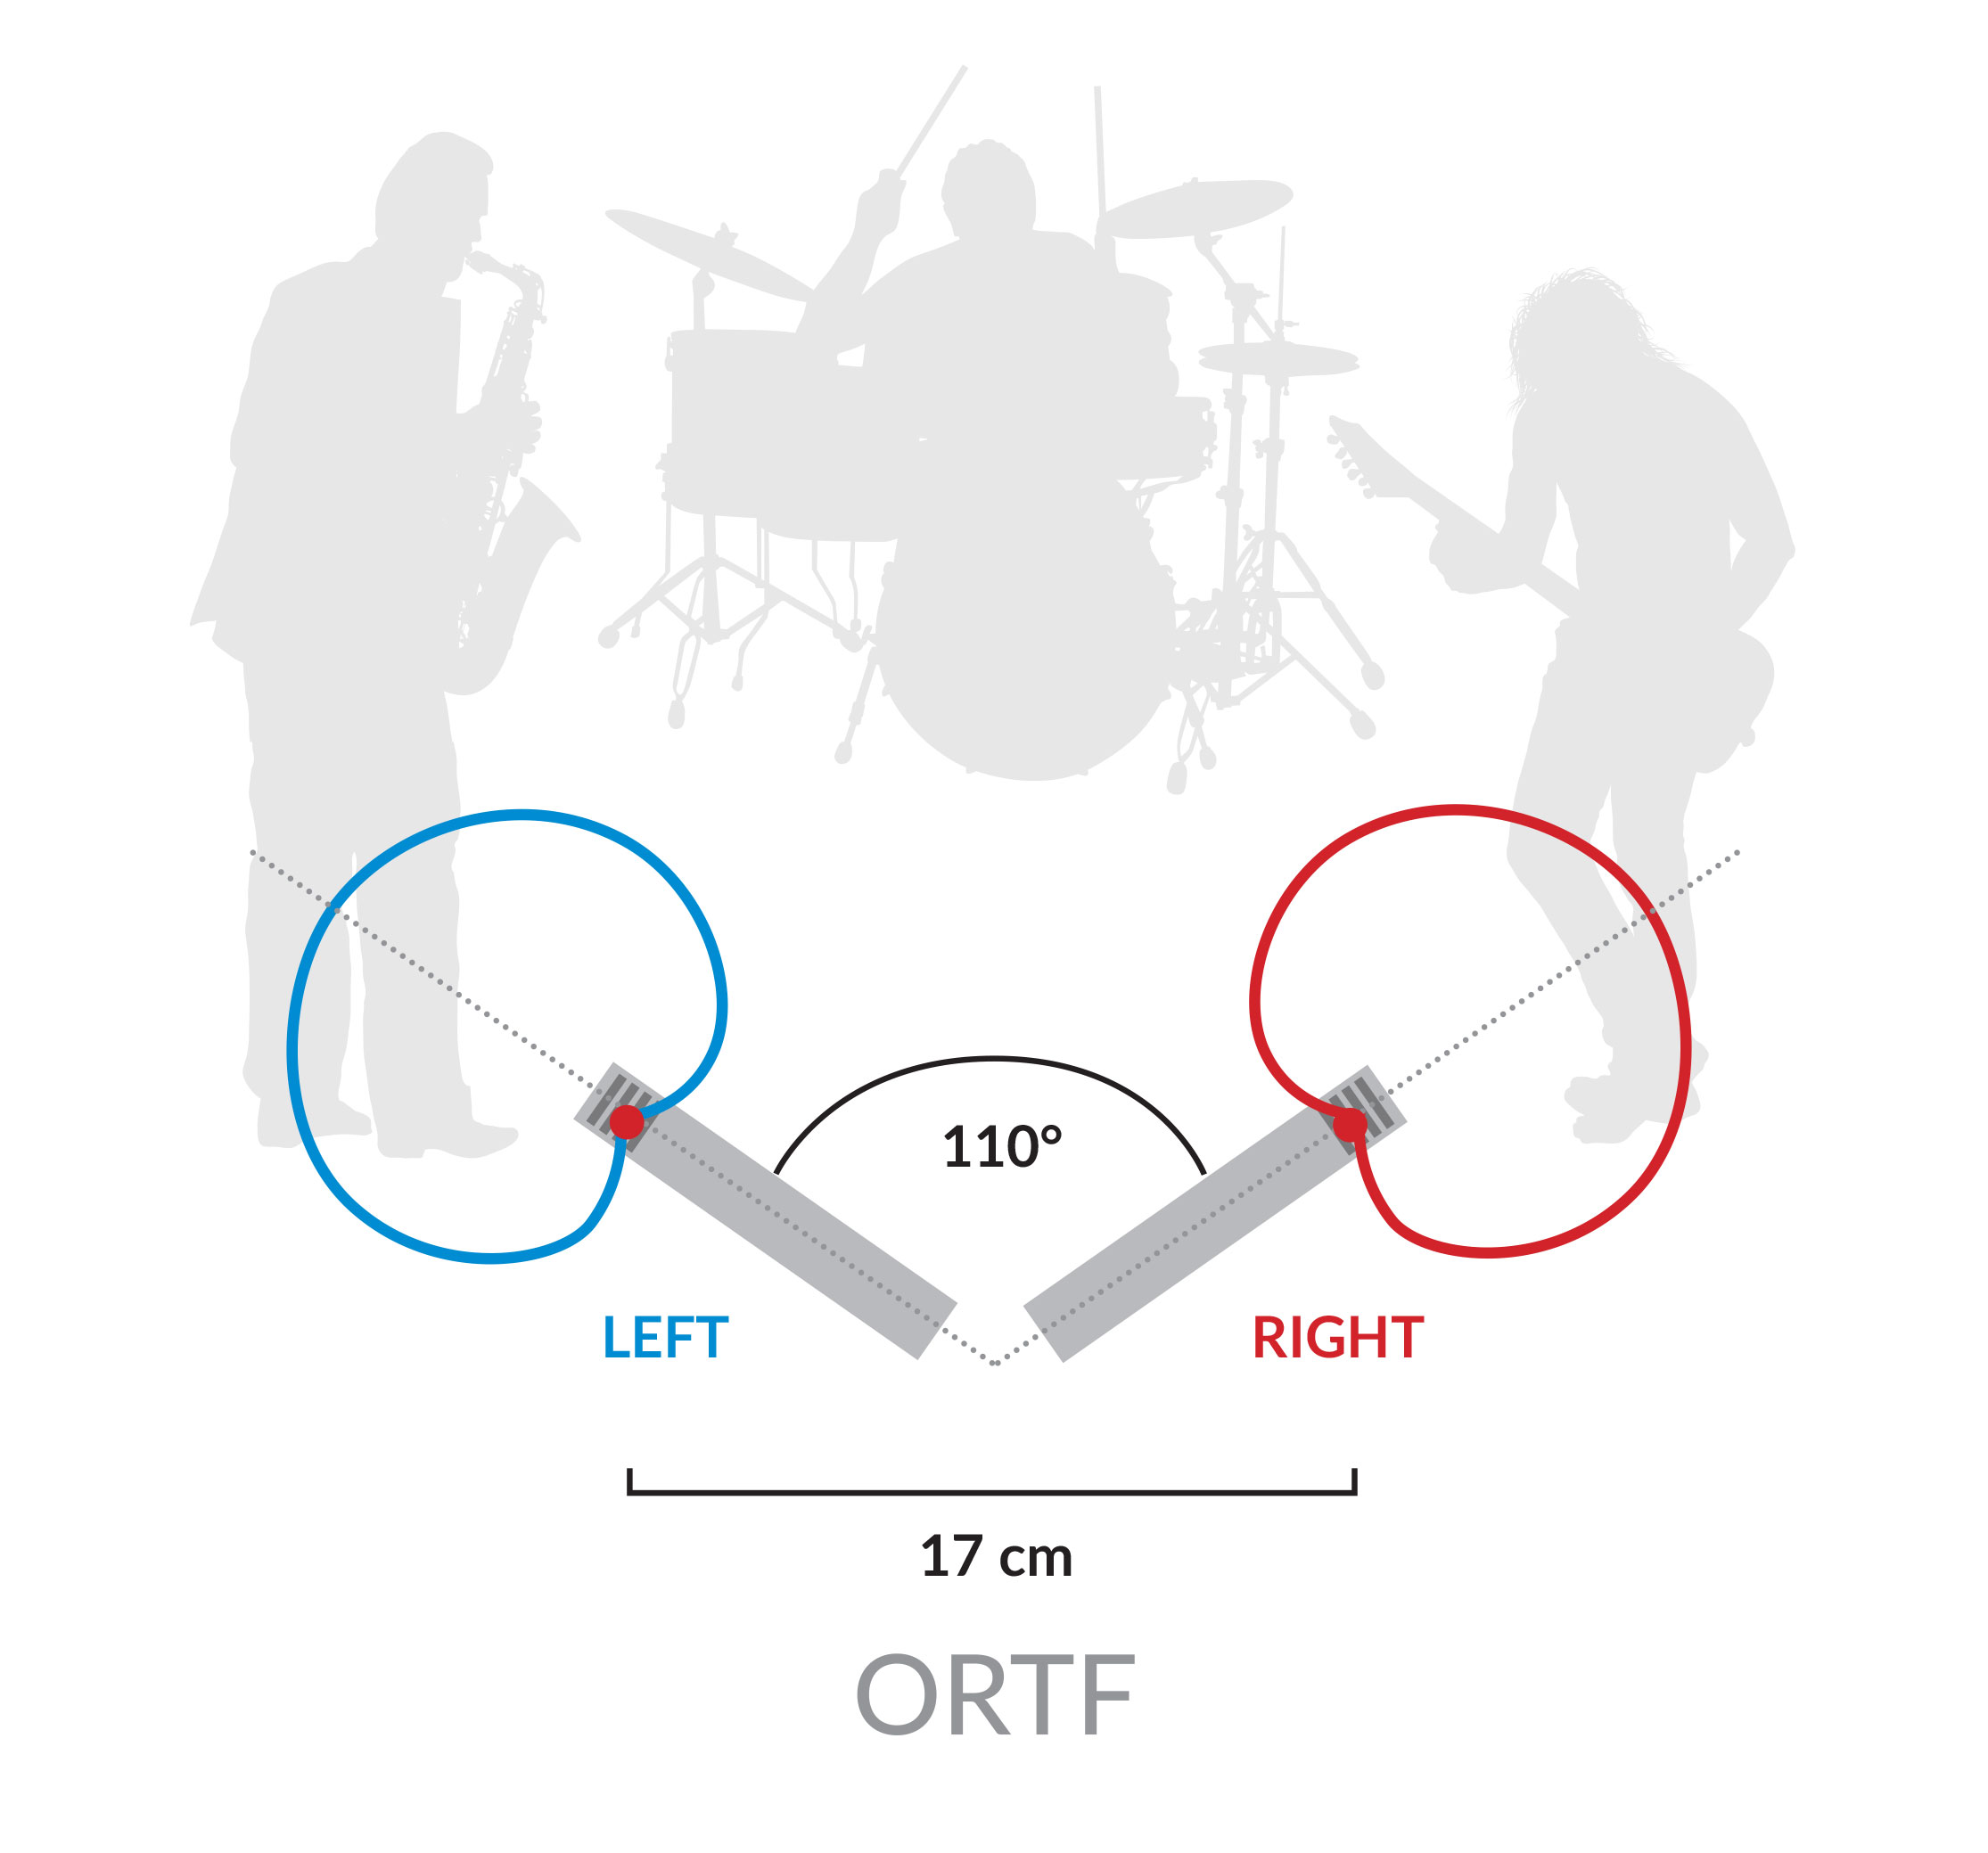 Another method is the near-coincident pair, or ORTF method. (The letters stand for the Office de Radiodiffusion Télévision Française, where the method was invented.) This technique uses two cardioid microphones with their capsules about as far apart as human ears are, and angled at 110 degrees. It produces a very natural sound and is fairly compatible with mono, but the distance between the microphones can cause cancellation at some frequencies.
 Then there’s the coincident pair. Angling two cardioid mics at 90 degrees with their capsules right on top of each other gives us an expansive pickup pattern, and also prevents virtually all phase cancellation issues since all sounds arrive at both microphones at exactly the same time. The disadvantage here is that the stereo image doesn’t sound as wide or natural. The mic patterns overlap quite a bit, and our ears aren’t perfectly coincident.
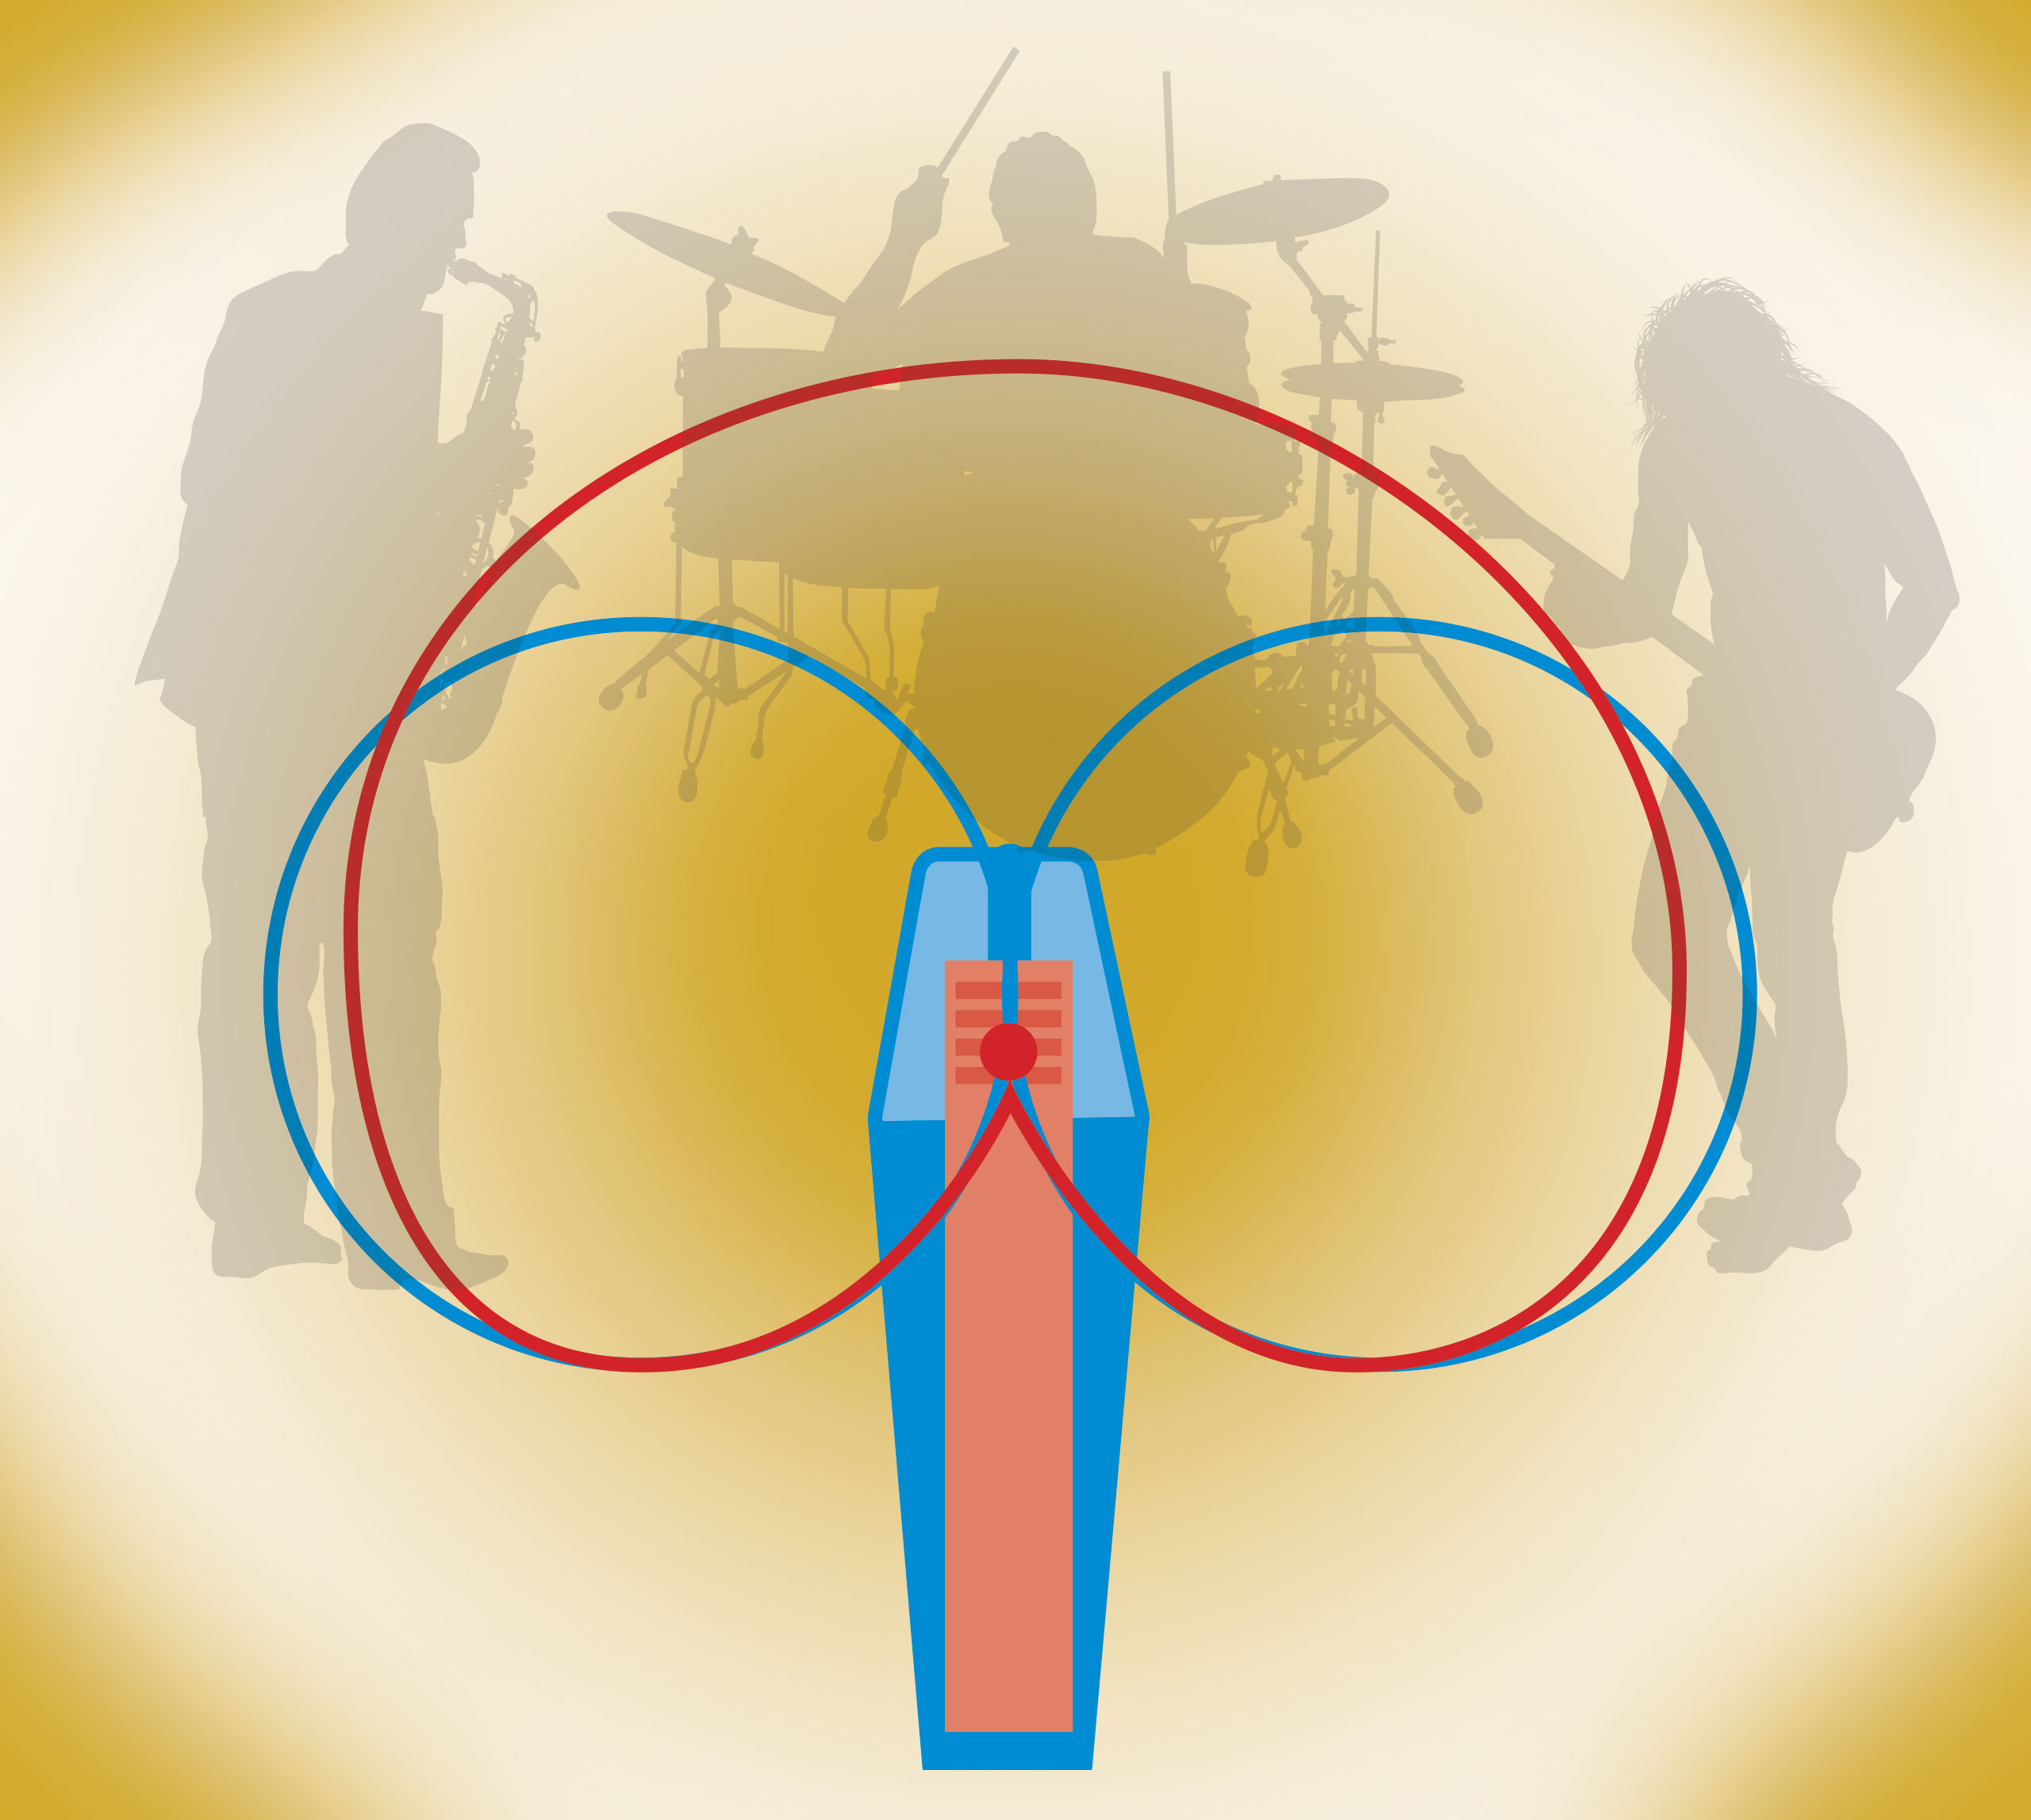
 So how do we get the wonderful width and sense of depth of an ORTF pair or even the exaggerated image of a spaced pair, but achieve the same perfect mono coherence as the coincident pair? The best way is with a technique called mid-side (variously abbreviated as M-S, M/S, or just MS) miking. The technique was developed by EMI recording engineer Alan Blumlein, circa 1933, and it’s ideal for broadcast use because while it produces a great stereo image, it’s also totally mono-compatible.
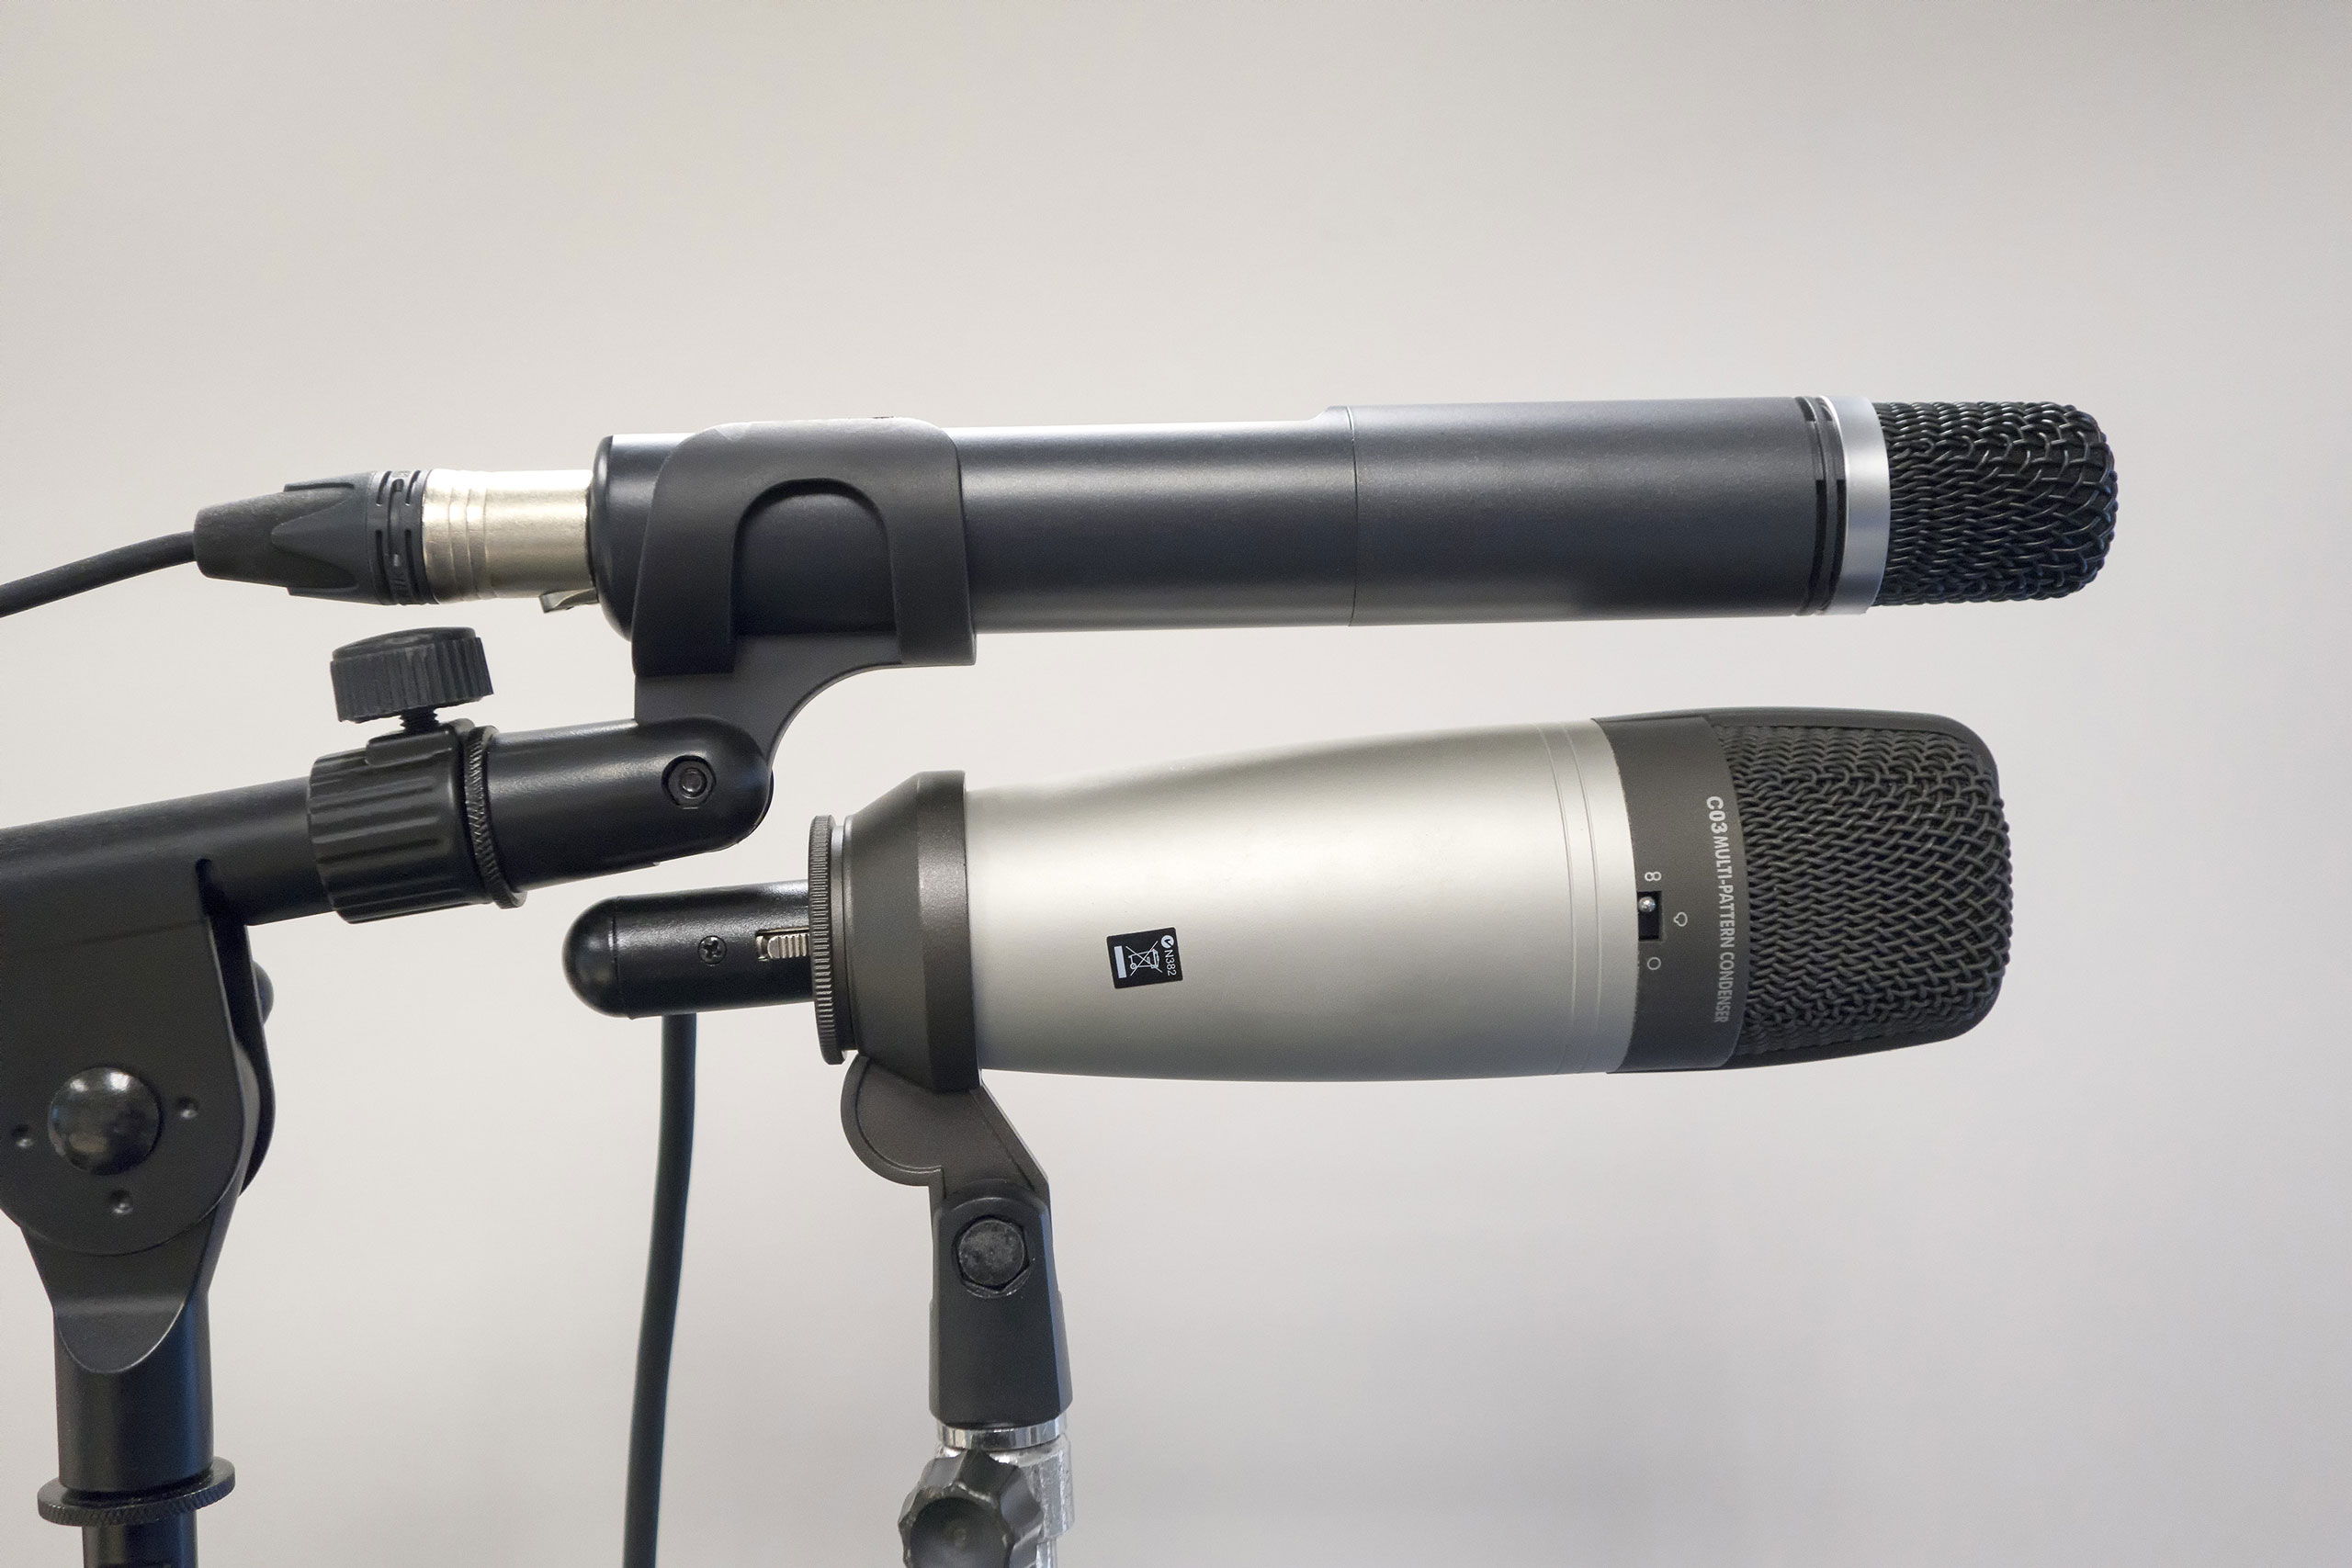
To do this, we’re going to need two microphones. One of them should be a bidirectional microphone. A dual-diaphragm condenser like the AKG C414 is ideal, but any bidirectional microphone will suffice if it’s of reasonable quality.
The other microphone is usually a cardioid. It should be of comparable quality to the bidirectional microphone and is also usually a condenser. A Neumann KM184 is a great choice, but again, microphone selection is not critical to the technique’s success. Only the patterns matter.
The bidirectional mic is placed on a stand with its capsule facing left and right. Generally, the “front” or “positive” side of the mic faces left and we will assume that here.
The second mic is placed facing the source. For reasons of phase coherence, it should be as coincident with the other mic as possible; ideally, its capsule should rest right above the bidirectional’s capsule.
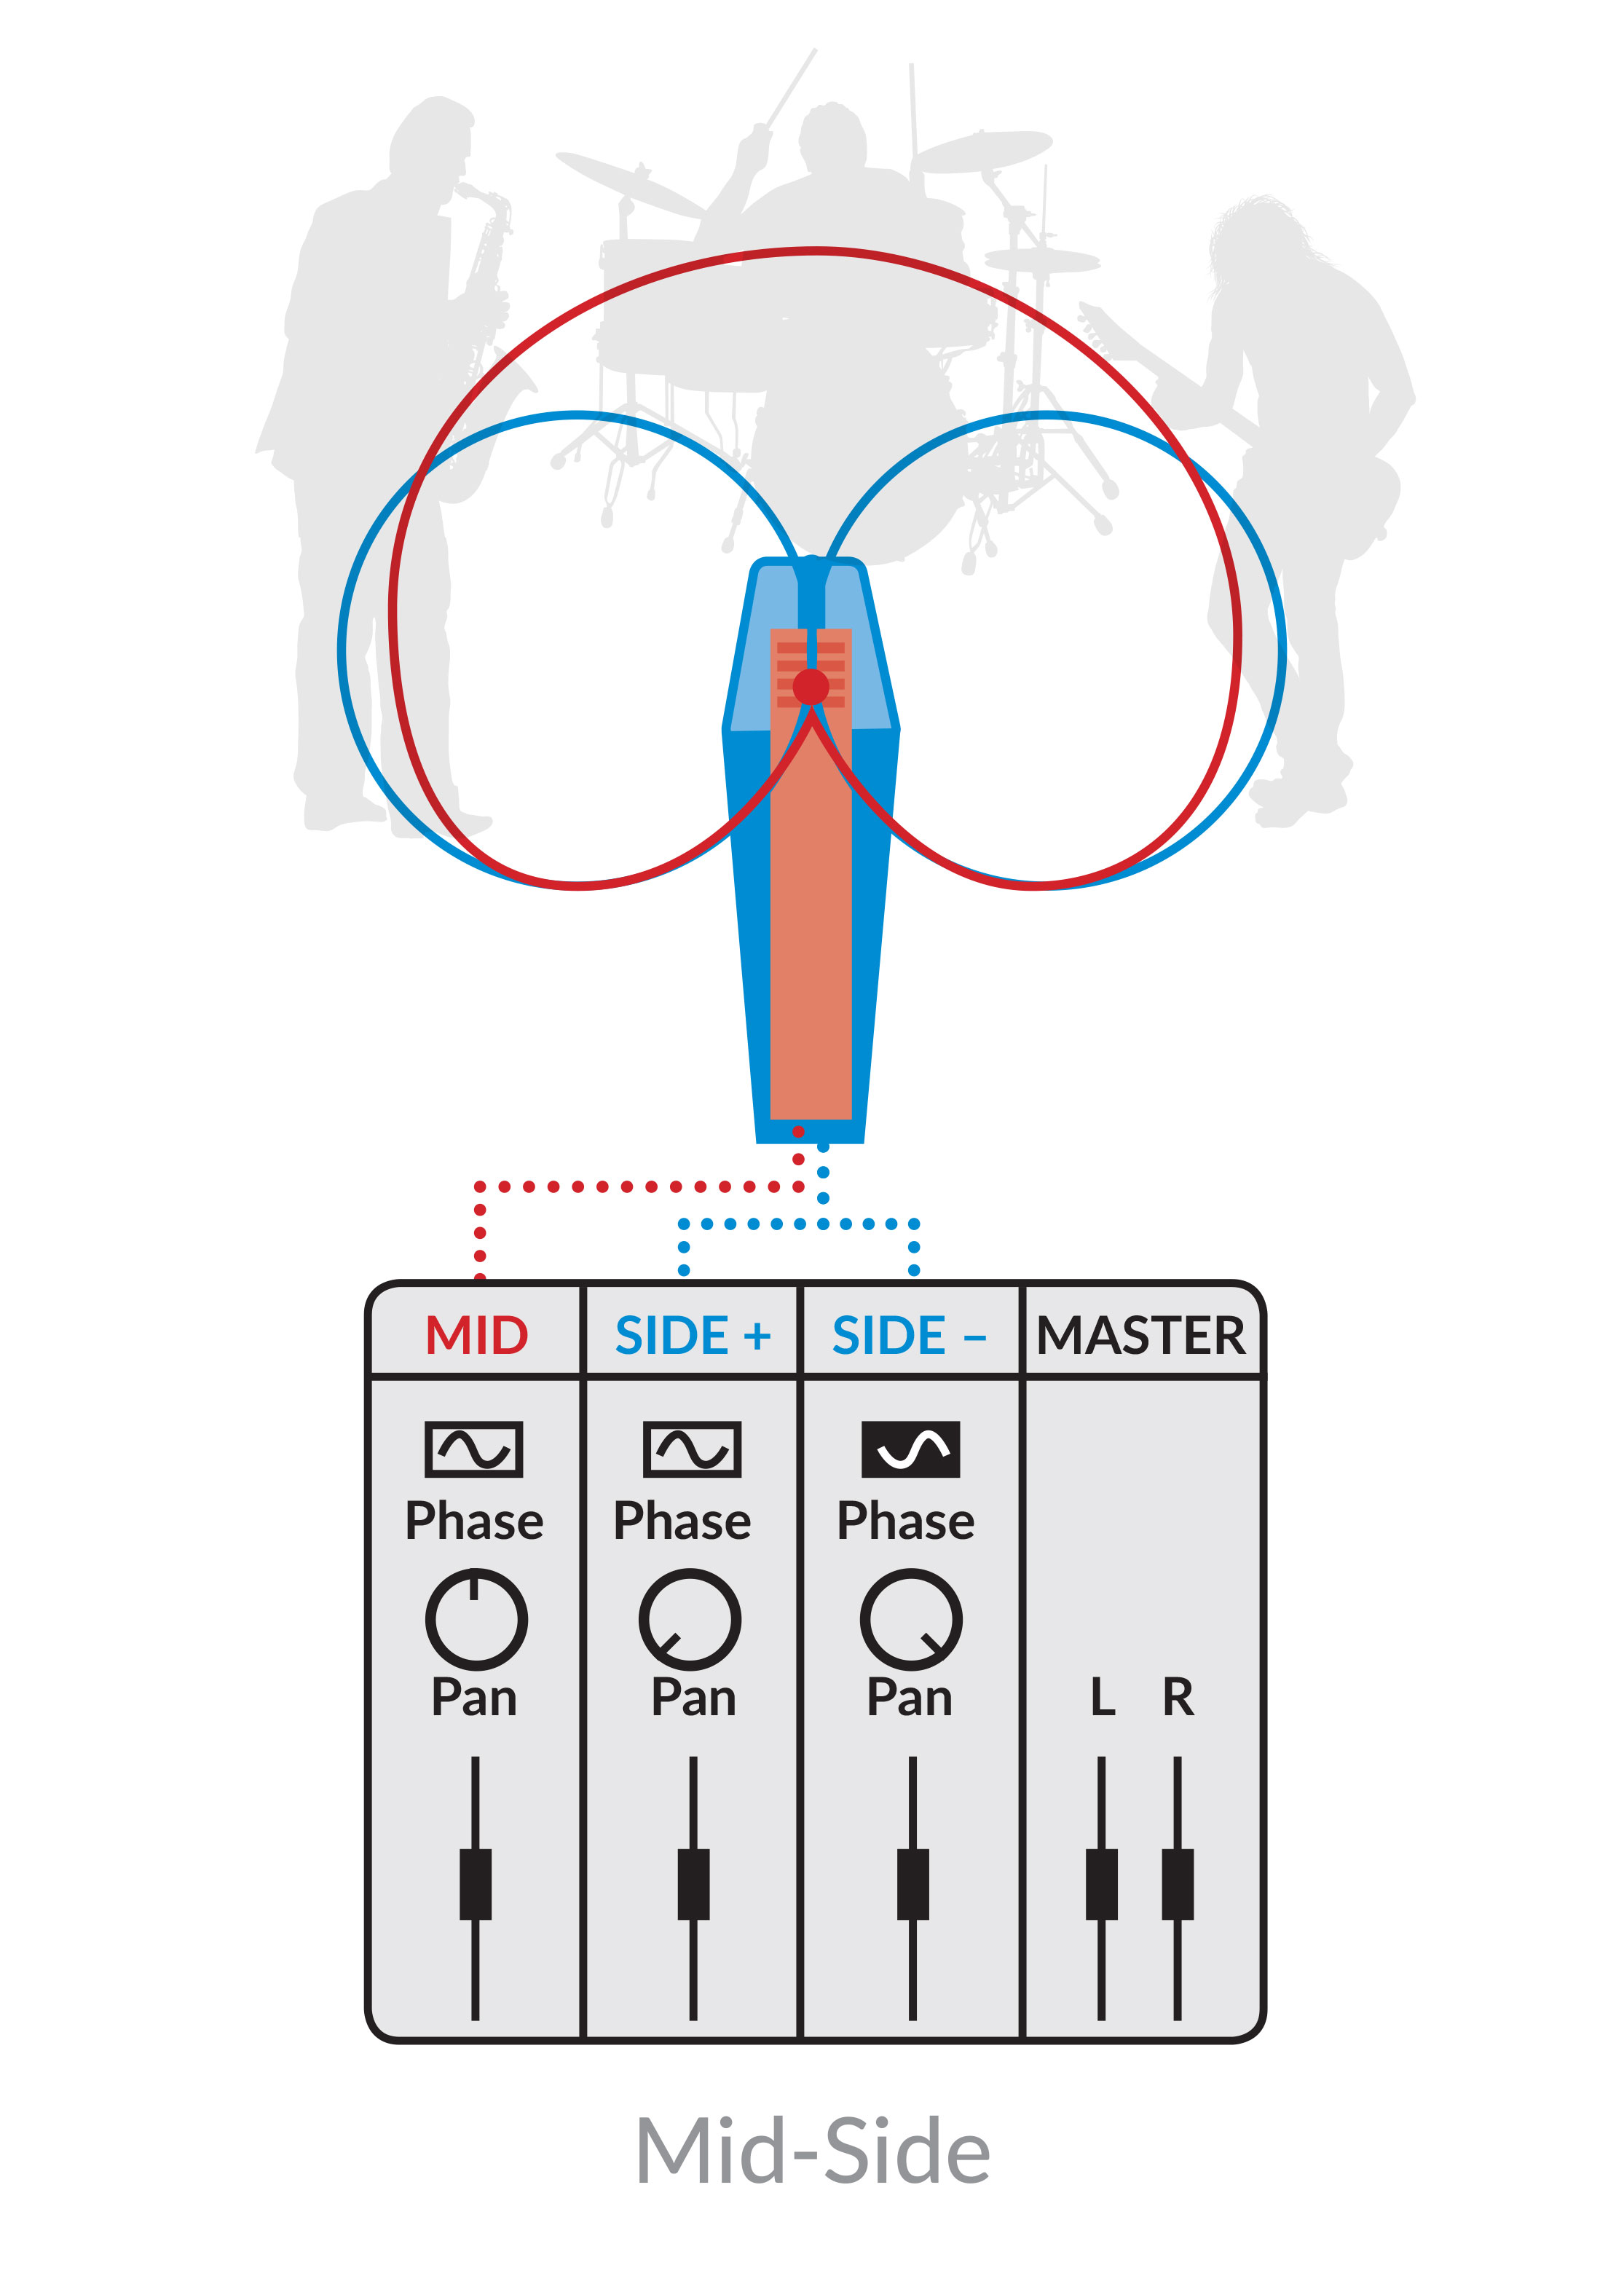
 So now we have cables from two microphones headed back to the console, and that’s where we do the interesting part: matrixing these middle and sides signals to a left/right pair. We’ll need three faders to do this.
On fader 1, we’ll assign the middle (cardioid) microphone. We’ll set it to a nominal level and pan it center on our stereo bus.
On fader 2, we’ll assign the bidirectional (sides) microphone. We’ll pan it to the left on our stereo bus.
On fader 3, we’ll assign the sides microphone again. (On an analog console, we can do this with a Y cable, or by way of the patch bay.) On this fader, we REVERSE the phase (polarity) of the incoming signal and pan it to the right.
Now all we have to do is set the trims on faders 2 and 3 to a nominal level, ensure they’re both set to exactly the same level, and bring up all three faders. You’ll be capturing a very wide, rich stereo field thanks to the combined patterns of the three microphones.
Here’s the best part. Try moving the level of the middle mic. As you pull it down, you’ll sense that the stereo image widens. If you push it up higher, the stereo image will narrow.
How does it work? For purposes of discussion, let’s call the middle mic M and the sides mike S.
The left channel of the stereo bus is receiving M + S, meaning that the sounds arriving at the left side of the sides microphone are being added to the middle mic signal.
The right channel is seeing M – S, meaning that sounds arriving at the right (back) side of the sides mic are being added to the middle mic signal. We flipped the polarity on this fader so that the sounds arriving at the back (right side) of the bidirectional mic, which are naturally of opposite polarity from the front, will again have the same polarity as the middle mic and add properly.
Signals arriving from dead center will enter both the front and back sides of the bidirectional mic at the same time, producing opposite signals that cancel, so those sounds are picked up only by the middle mic and are fed to both sides of the stereo bus.
But more importantly, because the two side mic faders are precisely level-matched and opposite in polarity, their contributions to the mix are exact opposites, and if the stereo bus is summed to mono, the sides signals will cancel out, leaving a perfectly clean mono signal from the middle mic. No mono compatibility problems can arise.
There are a couple of variations on the technique. You can try using an omnidirectional microphone for the middle channel, which makes the entire array essentially a stereo omni microphone. This can accentuate the pickup of room tone and reverberation if your room has good acoustics. You can also use a second bidirectional microphone for the middle channel with similar results, extending the pickup pattern.
The technique isn’t just for music, either. M-S miking a live shot, for example, or a speech before a live audience, has a tendency to put the viewer right in the middle of the crowd, improving overall fidelity of the experience. It’s even a good way of capturing crowd or environmental sounds that will later be mixed with a voice-over, dialogue, or an interview as stereo nat sound.
Mid-Side miking can save the engineer a great deal of time and aggravation, capturing a clean, clear, dimensional stereo image that’s ideal for television broadcast. It’s a technique every audio engineer should have tucked away in his bag of tricks.
Scott Johnson is a systems engineer and webmaster for Wheatstone. He has plenty of mic techniques up his sleeve as a lifelong audio engineer. When he’s not experimenting with Wheatstone mixers and mic processors, he can be found at the local community theater mixing sound for the latest production.
Enterprise Networking Can’t Do This!
Problems arise when transporting real-time audio over enterprise IP networks because of timing and synchronization issues. Ethernet treats audio packets like any other packet. It “looks” at the packet headers and pushes the packets to their destinations using the rules of Ethernet and IP, not audio. To ingest media and manage live streaming without packet dropouts, delays or corruption, you will need something that talks both IP and audio, and ideally knows AES67.
Broadcast-specific IP audio networks such as WheatNet-IP prioritize traffic for quality streaming, plus control and manage audio devices and mixes as well as bring audio into the network from mics and other sources.
I/O BLADEs, or access units, are connected together to form the WheatNet-IP audio network. All manage streams and most include utility mixers that can be assigned as part of a very low latency IFB subsystem and/or premixer in a network of other BLADEs.
There are almost a dozen different types of BLADEs, some specialty I/O BLADEs used for specific applications. For example, the M4IP-USB BLADE is often used as an interface between microphones and the network. It has an Ethernet port and XLR inputs with super-quiet preamps for four microphones as well as USB for ingesting audio directly into the network from computers and other devices. As a mic processor, it has full parametric EQ, de-esser and compressors for each channel, and as an I/O BLADE, it can route, control and manage audio streams.
But what if you needed to bring in audio from a camera or other HD-SDI source, or from a MADI intercom system? We have BLADEs for that, too. Our HD-SDI BLADE can de-embed and bring audio in from video production automation systems, routers, and other professional video equipment that use  HD-SDI and our MADI BLADE can exchange up to 64 bidirectional channels (AES10) of audio between our WheatNet-IP audio network and any MADI-compatible intercom system, TDM router, ProTools system or DAW.
Not only do WheatNet-IP audio network BLADEs talk IP and audio, they’re also AES67 compatible so they can be interfaced into any IP audio network that has AES67 (such as Dante®).
It’s all explained in our free ebook. Download your copy of IP Audio for TV Production and Beyond..
Q: I’m interested in AoIP for my facility, but I heard that I’ll need to regularly manage the streams. Is that true?
A: It’s true that older IP audio networks didn’t have an easy way to prune channel assigns. You’d have to delete these yourself periodically or get a bigger switch to handle an ever-increasing number of streams. That’s not the case with newer systems like WheatNet-IP, which continually prunes unused source groupings from the network so you don’t have to manually delete channel assignments that are no longer in use. No audio is passed or available on the WheatNet-IP network until it is requested. And when that request is closed, so is that audio channel. This eliminates you having to manage the streams, and dramatically reduces congestion and the possibility of packet collision/failure.

NAB: The Mission’s the Same. The Tools Have Changed.
Plan to stop in on our NAB presentation The Mission’s the Same - The Tools Have Changed on Saturday, April 7, when we’ll discuss the latest in smart virtual tools for the studio. We will go over some interesting AoIP developments and provide working examples of scripts and scripting tools now being used by broadcasters to create customized user interfaces, virtual environments and workflows. It starts at 1:30 p.m., Saturday, in room N260.
Also, be sure to stop by Wheatstone booth N6806 during the show for all the latest in studio networking, audio processing and editing.
Got feedback or questions? Click my name below to send us an e-mail. You can also use the links at the top or bottom of the page to follow us on popular social networking sites and the tabs will take you to our most often visited pages.
